May
24
2018
--

Weekly Journal of Ethical Hacking Part 11 Lecture 5

I didn’t notice that I accidentally skip some of the lecture to try and summed up. Specifically Lecture 5 and 6. It’s not like I haven’t done it. In fact, I did your exercise for this lecture. But I haven’t make a summed up version of this lecture yet.

In this Lecture, our goal will be to try to Enumerate our target. For this one, we don’t need to have Kali Linux, we only needed Windows command prompt because it was used for enumerating Windows OS.

Enumeration is used to collect information about shares on the network, User names signed to the network, and last time user is logged on.

Alright, let’s try to enumerate an IP address. We will be using nbtstat command for this. Let’s see what nbtstat has to offer.

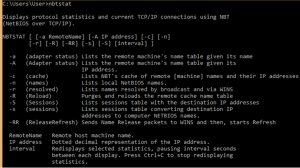
We will try the nbtstat -A [IP address] first. Here is the result.

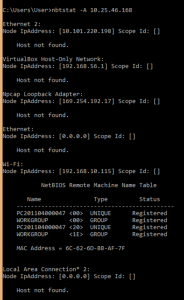
On the Wifi, it shows a NetBIOS Remote Machine Name Table. But what is NetBIOS? NetBIOS is stands for Network Basic Input Output System. It was a programming interface and it allows computer communication over a LAN (Local Area Network).

On the table there is some numbers beside the name. It was called suffixes. It was used to describe what the services is.

<00> is the Workstation service registered the computer name, or in other words NetBIOS name.

<20> is registered by the server register. The computer must has this service so they could share printers or files.

<1E> is signifies that Browser Service Election is running. Browser Service is is a feature of Microsoft Windows to let users easily browse and locate shared resources in neighboring computers.

Conclusion: You can use nbtstat to enumerate Microsoft OS. If you wanted to use it on Kali Linux, you need to download it first. It was used to show connections between computers and more.

Written by brigitta in: hacking journal,Uncategorized |
May
23
2018
--

Weekly Journal of Ethical Hacking Part 10 Lecture 8

Today we are going to learn about Social Engineering. In this topic, we will try to use human trust as our advantage to get information about them.

One of the way to do it is to make a a page that look exactly like a trusted website has. After entering their email and password, their data would be sent to us. In another word, we did an “Impersonation”. We can also get more information by either pretending as influential authority or just simply get to know them better.

First we would need to open the Social Engineering Toolkit (SET) first.

It will appear like this.

Before you can use this program, you will have to get through Terms of Service first.

After that, the main menu will appear and you can start to choose.

We will try to do Common User Passwords Profiler (CUPP). It’s used to find a valid password of target.

I used this link to installed CUPP into Kali Linux.

CUPP – How To Generate a Powerful Wordlist on Kali Linux ?

First, you would need to install the github with this command: git clone https://github.com/Mebus/cupp.git , then use this CUPP using python cupp.py -i. It will then show the Interactive Mode.

Conclusion: You can use SET to do Social Engineering hacking.

Written by brigitta in: hacking journal |
May
17
2018
--

Weekly Journal of Ethical Hacking Part 9 DVWA

In this one, I will attempted to download DVWA. For this post, I will try to download with the help of friend’s walkthrough because the pdf walkthrough is confusing.

DVWA Installation

First, we would need to change the directory first to /var/www/html . Then download the github zip using wget. wget stands for “web get”.

After getting the zip, unzip it using unzip command and the filename.

The ls command is used to list the names of the files and folders within the file system. While mv stands for “move”, which mv command purpose is to move files from one folder to another. Because I already move the files into the folder, it looked like this.

The chown command changes ownership of files and directories in a Linux filesystem. The R stands for “recursive”. It’s purpose is to operate on files and directories recursively. Enter each matching directory, and operate on all its contents.

Service command is used for starting or stopping  services by running a script. We will be running service mysql and apache2. ps aux returns the full command line of each process.

The last step for now is to install it. Write “Y” for all of it.

After this, you would need to put your Linux IP address to test if the installation is successful or not. Use ifconfig to find the ip address.

If it was working, it will be look like this.

We would need to open a certain file to continue our installation. Here is the steps:

gedit used to open this file:

You needed a recaptcha key for this. So let’s enter the link and get our key. I already make the site and get the recaptcha key.

Now put the keys into this file:

Then restart apache2 and service mysql.

Time to check if I have fixed the error. Open localhost/setup.php, and apparently there is two more error.

To change the allow_url_include, you need to get into php.ini first, so let’s do that.

At first I was confused how to open the php.ini file here. But apparently, I only need to used the Path written on Configuration File (php.ini) Path.

After using gedit php.ini, this file will appear.

Use search (Ctrl + F) to found allow_url_fopen and allow_url_include.

Turn it all into On and check if it’s work on setup.php. If it didn’t work, then it would means you have to change the settings in different php.ini.

Do the same process where you change all allow_url_fopen and allow_url_include into On, and it should be work now.

Now the next thing to do is fix the last error. It was kept inside the config.inc.php just like the recaptcha one.

Then change all of the settings for DVWA user.

After that, enter the mysql -u root -p to show the mysql setup. -u stands for username and -p stand for password.

After you filled all of the information, the MySQL data in Setup.php would change but the php gd error is not disappeared yet. Apparently you have to press Create / Reset Database

After click on that button, the login page would appear. This is what it looks like.

Open the README.md file so you would know what is DVWA username and password.


Written by brigitta in: hacking journal,Uncategorized |
May
17
2018
--

Weekly Journal for Ethical Hacking Part 8 Week 7.1

Apparently, I was actually configure the Kali Linux the wrong way. Took me way too long to ask my teacher. That is also because I thought I already did it correctly, but apparently I was wrong. I still did it wrong.

I can tell it was wrong because every time I turned off the Kali Linux, all of my progress is disappear. But at that time, I thought it was simply the part of the Kali Linux program so that no hackers could track my Kali Linux data and progress. So I always try to do everything from the lectures in one go.

And before we continue with how I (this time) fixed my Kali Linux, I also figure out that apparently Kali Linux has their own default password : toor. Because of this, I don’t have to turn off my Kali Linux again every time Kali Linux went to Sleep Mode.

1. I deleted my old Kali Linux

2. Open “File” and pick “Import Appliances”.

3. Import the Kali Linux file you download from www.kali.org

4. When click “Next”, it will show this new window. Click Import after you sure with the configuration.

5. Then open “Settings” to change some of the configurations.

6. In “General”, change “Type” to “Linux” and “Version” to “Debian (64-bit)”.

7. Then finally start the Kali Linux!

Conclusion: It has now finally working! None of my process has disappear now.

Written by brigitta in: hacking journal,Uncategorized |
May
03
2018
--

Weekly Journal for Ethical Hacking Part 7 Week 4 Lecture 4

In this one, we will discuss about “Target Discovery”. It could mean either discover old dns record or discover what is behind the Firewall. The reason why you would to look at the old record is because:

  • Find old scripts
  • Find Old Admin Page
  • Find Old Server to Breach In

Our goal is to test out dnstrail and robtex and see what kind of records they could found.

The first website you can used for this is DNStrails.  I will use wikipedia.net for example as usual.

I opened the one with CNAME first to see what kind of records CNAME has.

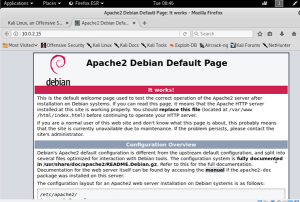
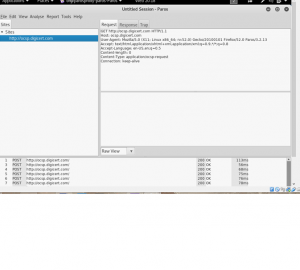
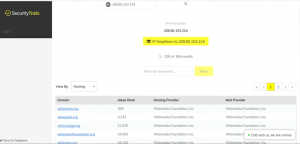
You can see the yellow button that said “IP Neighbouring to [208.80.153.224]”

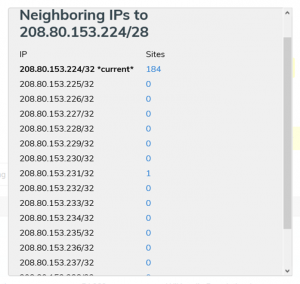
Wikipedia apparently has changed IP addresses numerous time before. Even one of the old IP address still have some site on it.

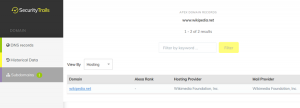
In this one I tried to open the AAAA Records.

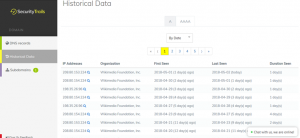
In this one there is no IP Neighbouring to [IP address].

Next is robtex.com. For this one, I’m using jo1.pentest.id.

Conclusion: With these websites, I could found out about all of the old records for the site I targeted.

Written by brigitta in: hacking journal |
Apr
26
2018
--

Weekly Journal for Ethical Hacking Part 6 Week 3 Lecture 3

In this week, we were asked to utilizing search engine. In this case, we will be using Kali Linux for the hacking. Although to be fair I’ve already used Kali Linux for the previous Week 2.

Our goal is to use tools in Kali Linux and Google to utilizing search engine.

I can’t figure out how to use goorecon… But at least I can figure out how to use theharvester! The harvester is used for looking hostnames with same names. The image I used here is not exactly a good example for it.

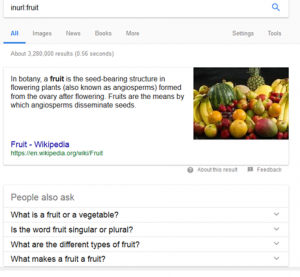
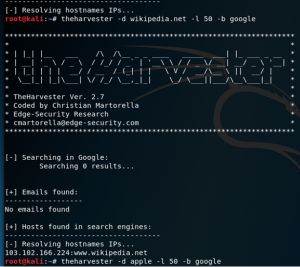
This program is used to limited the search of domain names and sees how many websites has the same domain names. For this example I used, apparently wikipedia.net is either not a hostname, or I used the search results number too low.

Then I also try to use Maltego. Too bad I needed an account if I wanted to use the free version which I haven’t make. But at least I can show you what it looks like now.

For Google Hacking… It apparently used for make the search you do in Google is even more specific. You can even search for things that only appear in the url.

It’s actually work! I only don’t know how to specify it to a certain website I want to look into.

Conclusion: You can use this tools and Google to find more information about the website you’re going to hack.

Written by brigitta in: hacking journal,Uncategorized |
Apr
24
2018
--

Weekly Journal for Ethical Hacking Part 5 Week 2 Lecture 1 and 2

In this week, we were focusing on Target Scoping and Information Gathering. In Week 1, we were only talking about using websites for gathering information. But this one, we will be given web tools to test things out.

Our goal is to learn how to use the tools for Target Scoping and Information Gathering.

The first thing that the the teacher recommend in the slide is Paros Proxy. It isn’t working on Windows anymore. I tried, and it stuck on the loading screen. It never moved past that. In Kali Linux it was working. The problem is, it was too different from the slides. The Spider is not where you put the Website link anymore. That’s why I have to do some configuring before I could even use it. Thanks to this man, I manage to figure it out.

Make sure that both localhost and port in the Firefox ESR and in Paros is the same. After that, just enter a website in Firefox ESR and Paros will automatically working

Next, the Host and Whois. You can use it to gather IP addresses and Domain Information.

Conclusion: We learned how to use the tools for target scoping and information gathering.

Written by brigitta in: hacking journal |
Apr
10
2018
--

Weekly Journal for Ethical Hacking Part 4 Week 7

Only just today that I have finally manage to download my kali linux in my Virtual Box.

Our goal is to how to download Kali Linux.

I found out that the way I installed my Kali linux is wrong. When I ask my friend, they said that I should just simply import the file I download from www.kali.org into Virtual Box.

I did that, and in a way it was working, but there is still nothing good appear on the screen. So I try something else. I open the Storage settings, and see the Controller: IDE is still empty. So I put in the Kali Linux iso into the Controller:IDE.

It is finally showed this screen:

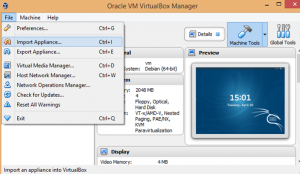
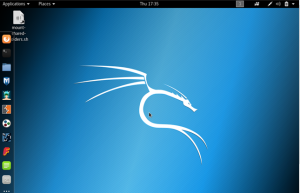
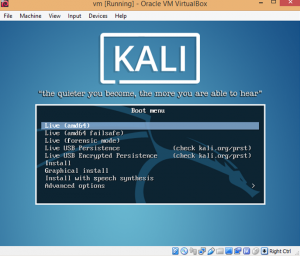
This showed that the Kali linux is starting to working.

But when I pressed live (amd64):

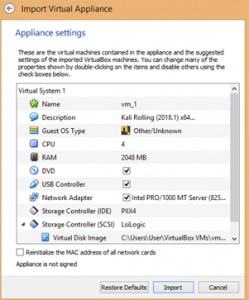
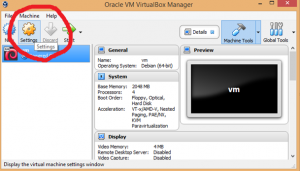
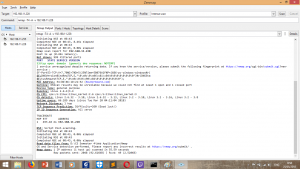
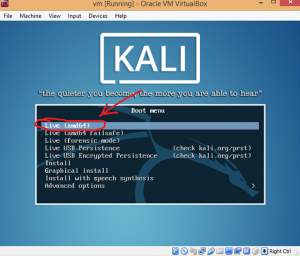
An error appeared. It said: “This kernel requires an x86-64 CPU, but only detected an i686 CPU. Unable to boot – please use a kernel appropriate for your CPU”. On the most tutorial I found, they told me to change the settings in my BIOS, which will require me to restart my computer. I had never used this before which makes me panicking and I looked for another tutorial.

Thankfully, I found this tutorial: https://askubuntu.com/questions/308937/cannot-install-ubuntu-in-virtualbox-due-to-this-kernel-requires-an-x86-64-cpu

Apparently, the only thing I need to change is the settings in “General”.

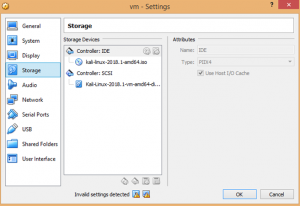
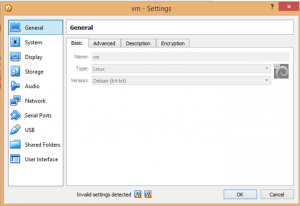
Change the Type into Linux and change the Version into Debian (64bit).

Conclusion: I can finally install Kali linux and I documented how I did it.

Update: This is the wrong way of installing it. Don’t try to install it this way. Use this version instead: http://2001586193brigitta.blog.binusian.org/2018/05/17/weekly-journal-for-ethical-hacking-part-8-week-7-1/

Written by brigitta in: hacking journal |
Apr
05
2018
--

Weekly Journal Ethical Hacking Part 3 Week 6

I’m learning the program we were going to used tomorrow. I already learn how to use nmap before. With nmap, you can easily sees what port from certain ip address that are opened or closed.

Out goal is to see what kind of vulnerabilities you can find with nmap.

It also count how many closed port the ip address has. It even can see the details for the owner of the IP address like the OS of the owner, NetBIOS name, and more.

Update:

On 25 May, 2018, I tested this nmap with the same IP address and some of the content has changed now.

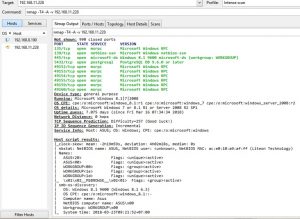
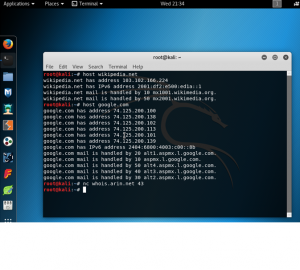
In this output, it only show one open port which is port 53. Port 53 is Domain Name System or DNS. DNS is a naming system for computers, services, or other resources connected to the internet.

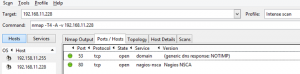
Apparently, other than port 53, port 80 is also open. Port 80 is HTTP or Hypertext Transfer Protocol.

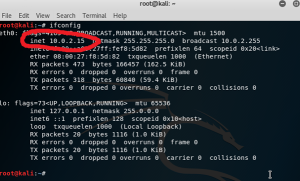
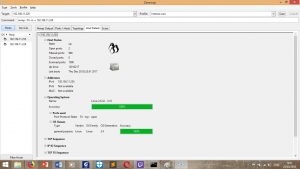
And this is show all about the target details, especially their OS. They are apparently using Linux for their OS and they only have one IP address.

Conclusion:

nmap can be used to see which port is opened or closed. nmap can also be used to see OS devices from your own computer or other computer. You need their ipaddress first.

Written by brigitta in: hacking journal |
Mar
29
2018
--

Weekly Journal for Ethical Hacking part 2 Week 5

I had assignment to try to Enumerate three website that our teacher gave to us.

wp1.pentest.id, jo1.pentest.id, and pentest.id.

Our goal is to try to enumerate this three websites.

To enumerate this website, we would need to know their ip address first. Using https://ipinfo.info/html/ip_checker.php , we could found out what these websites IP address is.

wp1.pentest.id = 87.98.172.193

jo1.pentest.id = 87.98.172.193

pentest.id = 104.28.31.3

Apparently, wp1 and jo1 has the same IP addresses. Now we will be using nbtstat to enumerate these website.

There is no host could be found for each of this ip addresses. Some said it’s because my firewall is blocking my computer to find the results. I haven’t try to figure out this results.


Update:

This time I will check the enumeration for this websites in both home and Binus Universtiy area. If both still failed, then the real final conclusion is that I’m still failed.

—————————————————————————————

Conclusion:

Firewall blocked me from checking others ip addresses access. The continuation of this research continued in next week when I used this IP Address on my nmap to see their vulnerabilities.

Written by brigitta in: hacking journal |

Powered by WordPress. Theme: TheBuckmaker. Zinsen, Streaming Audio